 Please wait...
Get started using your .Asia domain name!
 Run your website or microsite on .Asia to instantly connect with the fastest growing market in the world.
We've got all the tools you need to get your new .Asia domain up and running in no time.
Retake control of your social web!
Get your .Asia domain up and running with forwarding to Facebook, or domain mapping with WordPress, or setup your own URL shortener.
Domain Forwarding:
-
Case Study:

DBS Bank is a regional bank that describes itself as "a bank that specialises in Asia". Incorporated in Singapore in 1968, DBS Bank is now the largest bank in South East Asia by assets.
In 2013, the DBS Bank consumer team in Hong Kong had an idea to use Facebook to create a collaboration between investors to drive up the interest rate. It was aimed at encouraging wealthy clients to make large deposits with DBS. The more people that enrolled, the higher the rate of interest they got on the deposit. The program (uGOiGO) was a huge success and attracted affluent individuals to spread the program amongst their friends and associates using social media.
To further enhance their social media strategy, DBS leveraged the power of Domain Names. Particularly, they registered www.DBS.Asia and forwarded the domain name to a corresponding page on Facebook. By doing this, DBS is able to advertise and promote their social media campaign directly to customers under one memorable, geo-relevant web address – www.DBS.asia.
URL Comparisons:Advertised URL Without Domain Forwarding: www.facebook.asia/dbs.hk?brand_redir=1
Advertised URL With Domain Forwarding: www.DBS.asia
Which URL looks more attractive and easier to remember? The answer is clear.
Get your .asia domain redirecting to your Facebook page in just a few easy steps:
Step 1
Log into your domains.asia account using your email address and password
(if you don't already have an account or have not already registered a .Asia domain name, you may do so here)
Step 2
Enable Advanced DNS Manager
Advanced DNS Manager is a free service, which enables you to put and manage your domains on our registry service provider, CentralNic USA's, well proven DNS infrastructure.
To setup your domain on Advanced DNS Manager:
- From the 'Account Summary' tab, click 'Advanced DNS Manager' under the 'Nameserver' Column
- Confirm you have read and accept the terms and conditions
- Click 'Activate domain on Advanced DNS'
Step 3
- From the 'Account Summary' tab, click 'Advanced DNS Manager' under the 'Nameserver Column
- Scroll down to the Box titled 'Web Forwarding' and click the 'Set up Web Forwarding' button
- Enter your Facebook web address into the field provided Tip: Your Facebook web address will look something like "www.facebook.com/PageOrBusinessName". If you haven't assigned a vanity URL for your Facebook page, the address will look something like "www.facebook.com/pages/PageName/129934687038220" per default.
Choose one of Redirection options: - Domain Redirect: Facebook URL will be displayed in the browser after your audience is redirected to your Facebook page.
- Domain Masking: Your .Asia domain name will stay in the browser's URL bar after your audience is redirected to your Facebook page.
- Click the 'Save' button.
And that's it!
Remember that changes can take from 24 to 72 hours to become fully updated across the Internet (otherwise, known as propagation).
 Tips:
Tips: - Facebook now allows you to change your vanity URL once after choosing your initial name. Remember to update your .Asia domain redirection if you do make a change.
- You can follow these same steps to redirect your .Asia domain to other social networking services such as Twitter, Weibo, Instagram, Flickr, YouTube Channel, or even another standalone website. Just replace the Facebook web address with the web address of your final web destination!
Domain Mapping
-

Ben Davies is a Bangkok-based journalist, photographer and author whose work has appeared in a wide range of distinguished publications and media. During the course of his career, Ben has reported from over 50 countries around the world. With his extreme schedule, Ben chose WordPress' hosted platform to house his popular blog. From its easy-to-use publishing interface, extensive plugins libraries and built-in photography themes to tech-free hosting responsibilities, WordPress was a great choice for Ben.
But as with other free hosted services, Ben's account and website is tied to a WordPress.com-branded domain name such as http://bendavies.wordpress.com. For users like Ben who truly want to make the website their own, WordPress has add-on options such as Domain Mapping. Domain Mapping is more than just domain forwarding because visitors to your website will see your .asia domain name in the browser's URL bar and mapped to each individual page, such as www.BenDavies.asia.
URL Comparison and example:
Default Wordpress URL: http://bendavies.wordpress.com
Domain Mapped Wordpress URL: www.bendavies.asia
Today, the Domain Mapping option from a WordPress.com account costs US$13/yr (payable to your WordPress.com account). Once, you have purchased, the add-on from within your WordPress.com account, it'll require you to point your .asia domain's nameservers to WordPress.com's servers.
Here are the steps:
Step 1:
From your WordPress.com account, Add the domain in the Store → My Domains section of your dashboard.
Step 2:
Log into your domains.asia account using your email address and password
(if you don't already have an account or have not already registered a .Asia domain name, you may do so here)
Step 3:
- From the 'Account Manager' Tab, select the box next to the domain you wish to update and click 'Edit Nameservers'
- On the next screen, in the 'Update DNS Servers' box, enter the nameservers specified by WordPress.com. It should be:
NS1.WORDPRESS.COM
NS2.WORDPRESS.COM
NS3.WORDPRESS.COM - Click the 'Update All Domains' button
Step 4:
In your WordPress.com account, switch the primary domain in the Store → My Domains section of your dashboard
That's it!
How quickly you see the change depends on your ISP and the "propagation". This period typically requires 24-72 hours. Clear your browser's cache if you have trouble seeing the change after 72 hours.
For official instructions and details about Domain Mapping from the WordPress.com, please visit:
http://en.support.wordpress.com/domains/map-existing-domain/
Tip:
If you are on a different blog service such as Blogger or Typepad, they also offer Domain Mapping and you can map your .Asia domain to those websites in similar fashion. Please see the official instructions offered from these respective websites:
Blogger: (referred to as 'Custom Domain') https://support.google.com/blogger/troubleshooter/1233381?hl=en
Typepad: http://help.typepad.com/domain_mapping.html
URL Shortener
-

There are many popular choices of URL shortener services available such as Goo.GL, TinyURL.com and Bit.Ly. Users can take their long URLs and convert them to shortened URLs that are cleaner and easier to remember for advertising/layout or, short enough to allow sharing of links via character-limited short messaging platforms (ie. Twitter). One other benefit URL shortener services offer is the ability to track your links. This is especially important to marketers who need to measure the performance of URLs tied to promotions.
But with these benefits comes a caveat. Your URLs look the same as the millions of other shortened links out there. How's a user to distinguish content between http://bit.ly/1r5gqYc and bit.ly/1lP1lSU - especially when other businesses and personal website links use the same service?
One such URL shortener service provides the ability for personal and business users the ability to create their own URL shortener service. Bit.Ly allows you to integrate your own domain name with their service engine. This means that once a company's domain name is setup with Bit.ly's branding option, a single marketing employee would be able to more independently and productively setup his own marketing campaigns. He would be able to design his promotion page on Facebook, shorten the URL using a company-branded domain, spread the shortened URL on twitter and in a magazine, then sit back and watch the reports he can self-generate using on Bit.Ly's platform. No more having to beg his I.T. team for their technical assistance (which they would probably turn him down without him first jumping through red-tape covered hoops)!
Case example:
Let's have a live look at ChannelNewsAsia.com - a website using a branded Bit.Ly strategy. This news portal publishes countless Asia-related news articles daily and offers the ability for its readers to share their articles across popular social media platforms with a click of a social media button. If a reader wanted to share one of its articles the traditional way, they would have to forward a link similar to the following format: http://www.channelnewsasia.com/news/technology/read-all-about-it-news/1305764.html.
But because ChannelNewsAsia.com registered the short domain cna.asia and integrated it with Bit.Ly's branding engine, they now enable their readers to share that same article example as: http://cna.asia/Xd1Wse which is branded, short, and traceable!
Setup a branded URL shortener for your business using a .Asia domain by following the following steps:
Step 1:
If you don't already have an account or have not already registered a .Asia domain name, you may do so here. If you have already registered a .asia domain name to be used for your URL shortener, proceed to Step 2.
Bitly's Requirements:
- The domain name you choose to register for Shortened URLs can only be used for this purpose.
- Your short domain name needs to be 15 characters or less (including the dot)
Step 2:
Tell Bitly about your domain. Sign in to your Bitly account, go to 'settings' from the upper right pull-down menu and click on the 'Advanced' tab (or click here.)
Under 'Branded Short Domain' let Bitly know if you plan to use your Branded Short Domain for personal or business use. If you are business, you'll be asked to fill out a brief survey for Bitly's Brand Tools team. If the domain is for personal use, you can add your Branded Short Domain in the text box provided. Note: you will need to verify your email address to take this step. You can do that here.
Bitly recommends completing this step first before modifying DNS, so that if you are moving over an existing site you won't experience any interruption in service. However, don't take this step until you are ready to update your DNS records. The steps to update DNS are found in Step 3.
Step 3:
- From the 'Account Manager' Tab, select the box next to the domain you wish to update and click 'Advanced DNS Manager'
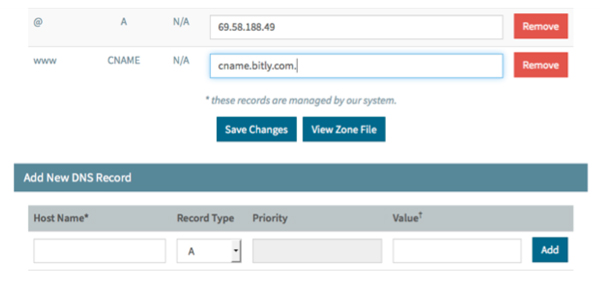
- On the next screen, under the 'Current DNS Records for [yourdomain.asia]'
- Edit the existing A record for your site and change the IP address to 69.58.188.49 If there is no existing A record (which is uncommon), add a new one. The A record's "host name" should be either the character @ or your base domain (both mean the same thing). You should only have one A Record. If you have more than one, remove all others and leave only the one pointing to Bitly's IP
Note: In your DNS, you can also add a "www" entry for your domain name, which you will point to 'cname.bitly.com'. For example, if your short domain was itsy.asia' you'd point your CNAME record for 'www.itsy.asia' to 'cname.bitly.com.'
Here is an example of correct DNS settings for a Branded Short Domain (not a subdomain) on Domains.Asia:
It can take up to 48 hours for domain changes to propagate. You'll know the DNS has been set up correctly when you have the ability to default your short domain in your Bitly settings under 'advanced'.
Your private email address!
Use your .Asia domain for your professional and private online identity, and setup to manage your email with Gmail, Outlook.com, etc. on any device.
- Jake Takes Charge of His Email
-

Meet Jake Walsh, our fictional friend, who has just registered a snazzy domain name to match his home business selling custom cakes – www.JakesCakes.asia.
Jake has been baking custom decorative cakes for a few years as a side hobby/business. In the beginning, friends and referrals would contact him via his free Hotmail account, which was manageable at the time. But as Jake's cakes grew in popularity, and demand increased to the point where he was able to turn his hobby into a full time job, the need became apparent to establish his own branding. He took the first step and registered the domain name JakesCakes.asia and forwarded it to his Facebook page. Now all he needed was to setup a corresponding email address (orders@jakescakes.asia) where his clients could reach him. He has a few options with Domains.Asia:
Email Forwarding:
Email forwarding is currently offered to all Website Builder users as a free add-on service to complete your online presence. Jake's free email forwarding account(s) enables him to advertise a professional email address using his .Asia domain name, and forward it to his existing email address. For example, Jake can setup orders@jakescakes.asia and forward it to jake1977@hotmail.com. This is the easiest method to setup but when he replies or sends an email, it'll be from his Hotmail.com account – which means his customers will see emails from jake1977@hotmail.com rather than his branded email: orders@jakescakes.asia.
 3rd Party Hosted Email :
A hosted email setup allows Jake to send and receive emails using his own domain name @jakescakes.asia. There are free email hosting services such as Zoho Mail and paid email hosting such as Google (Apps). Both are widely used and have similar setups. This method requires Jake to edit his domain name's DNS configuration. The setup seemed a bit daunting at first glance, but when he actually went through the steps, it really wasn't so bad!
These are the steps for Setting up 3rd Party Hosted Email with your .Asia domain:
Step 1: Register your domain, or login to your existing account.
Log into your domains.asia account using your email address and password. If you don't already have an account or have not already registered a .Asia domain name, you may do so here.
Step 2: Enable Advanced DNS Manager for your domain
Advanced DNS Manager is a free service, which enables you to put and manage your domains on our registry service provider, CentralNic USA's, well-proven DNS infrastructure.
To setup your domain on Advanced DNS Manager:
- Click on the domain you want to manage on the 'Account Summary' page.
- On the domain settings page, scroll down to the 'Nameserver Configuration' and click 'Advanced DNS Manager'.
- Confirm you have read and accept the terms and conditions.
- Click 'Activate Domain on Advanced DNS'.
Already setup on Advanced DNS?
- Click "Edit Records" on the domain settings page, and skip to Step 3.
Step 3: Add a MX Record for your domain name:
- On the 'Advanced DNS' page, scroll down to the section titled 'Add New DNS Record'.
- Enter the MX configuration values provided by your third party email provider.
- Click 'Add' to save the DNS record.
And that's it!
Remember that changes can take from 24 to 72 hours to become fully updated across the Internet (otherwise, known as propagation).
Build a website with just a few clicks!
We've teamed up with Basekit to offer all customers a free website. Just choose a design, add content and be ready to go live with .Asia.
A website editor built for speed and simplicity
Website builder is a simple, user-friendly and affordable solution to building your website. It creates fast, impressive, 'design agency quality' results and requires no technical knowledge on your behalf.
All in all, it is the ultimate answer to your site building needs, enabling you to customize your website exactly as you like. You can even build your own online store! For all you techies and designers out there, go ahead and edit the HTML, CSS and Javascript to create your very own customized platform.
A website editor built for speed and simplicity
Templates
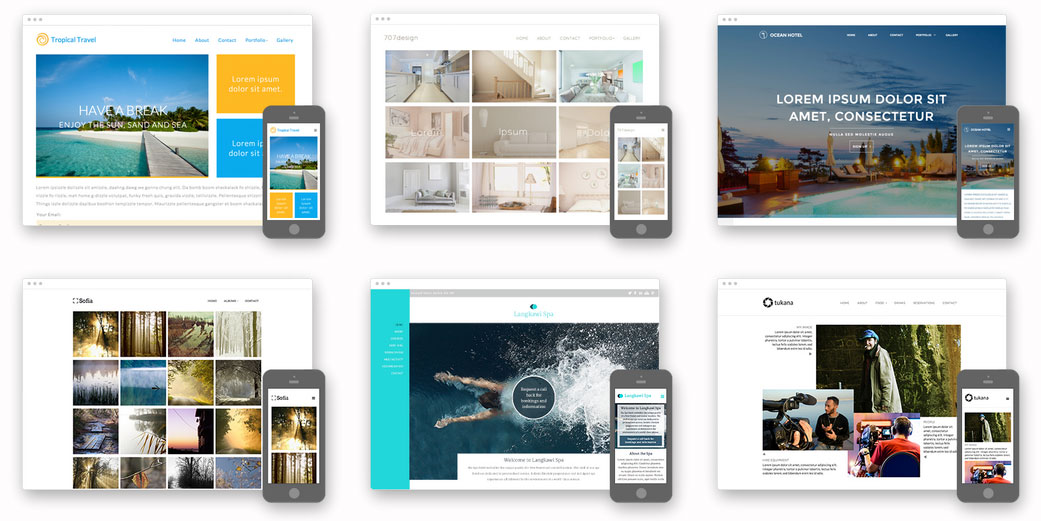
Every design reflects the current state-of-the-art in modern, responsive web design. New designs are added frequently and you can change your design as often as you like.
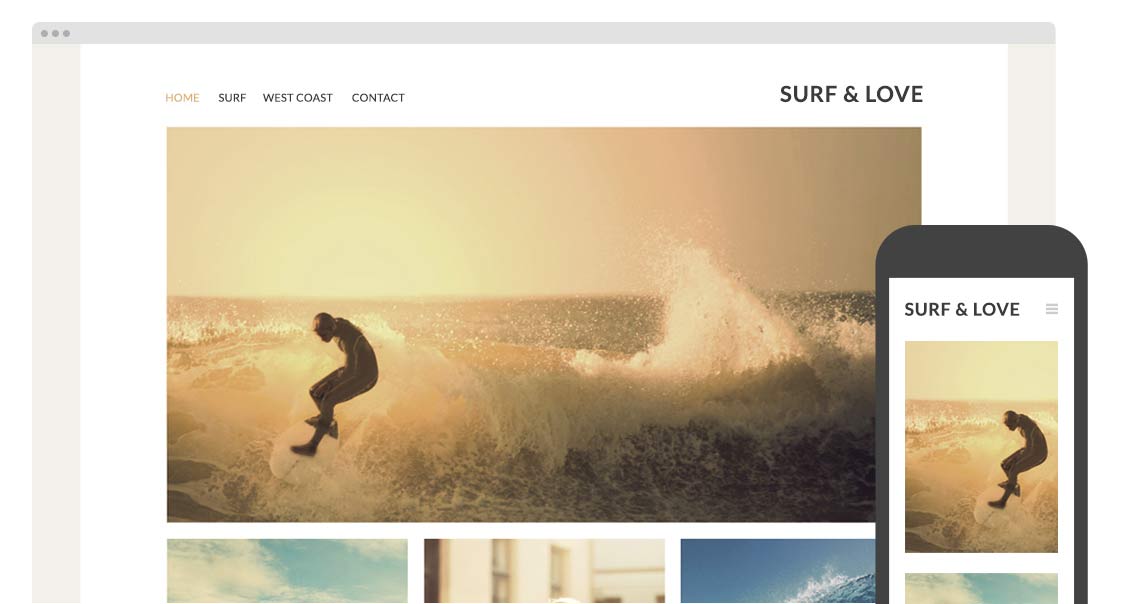
Responsive
Switch between Computer, Tablet and Mobile preview at any time to see instantly how your site looks on each kind of device. Publish your site at any time without any extra steps to make a mobile version. No other site editor makes building a responsive site so simple.
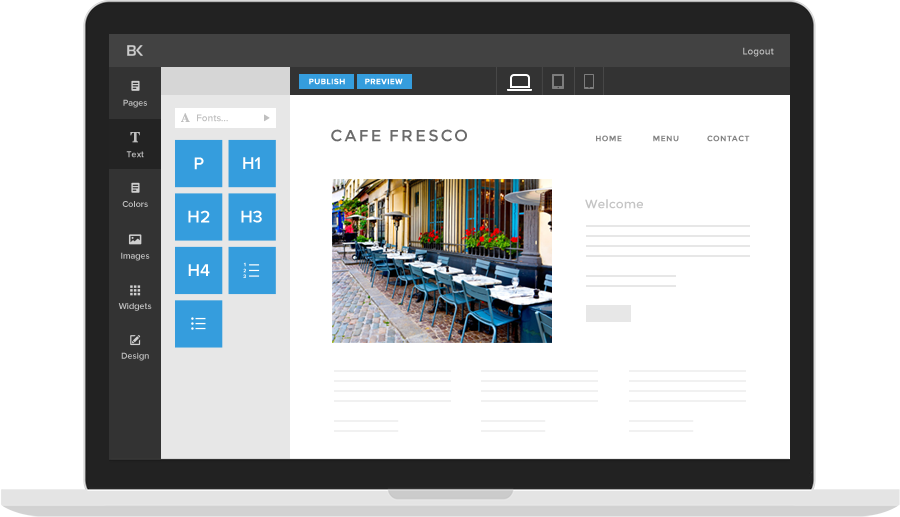
Drag & Drop
Drag and drop widgets onto any page to customise the content and layout. Every aspect of website creation and management is integrated into a single, simple to learn web app that is free of the complexity of older more complicated systems.
A range of cool features to help you build an amazing site with minimal fuss
Search Engine Opt.
Each site has everything you need to get found on Google and other search engines.
Facebook Publishing
Publish your site to your Facebook page and bring a social dimension to your business website.
Drop Down Menus
Built-in drop down menus take care of navigation for any size of site on any kind of device.
Location Maps
Make it easy for people to find your shop or business by showing them your location on a map.
Contact Forms
Our instant-setup forms make it easy for customers to get in touch. Form data arrives in your email.
Image Galleries
If you have lots of images use the built-in Gallery widget to show them at their best.
PayPal Button
You can be ready to sell your first items online in just a few minutes with rapid setup PayPal button.
Image Slideshow
Create a slideshow (or slider) with ease by simply selecting your images and choosing the timing.
Choose your package
Our website builder packages are designed to suit your web development needs. Try out our website builder today for free!
Try it
FREE
| Basic Templates |
| 2 Pages |
| 10MB Storage |
| Core Features |
| ✗ E-Commerce |
| 1 Email Forwarding Addresses |
Basic
$7/month
| Basic Templates |
| 10 Pages |
| 100MB Storage |
| Core Features |
| ✗ E-Commerce |
| 5 Email Forwarding Addresses |
Pro
$15/month
| Premium Templates |
| Unlimited Pages |
| 5GB Storage |
| Core Features |
| E-Commerce |
| 15 Email Forwarding Addresses |
All packages are purchasable on an annual basis only.